Subscribe and you will promptly receive new published articles from the blog by mail
The success of your Sharetribe platform heavily depends on a foundation that many entrepreneurs often overlook – hosting. While the features, design, and user experience of your marketplace are important, the hosting infrastructure that powers your platform can make the difference between a thriving digital marketplace and one that struggles to retain users.
The importance of choosing the right hosting provider for the Sharetribe marketplace

Selecting the appropriate hosting provider for your Sharetribe marketplace is a strategic business choice that impacts every aspect of your platform’s performance. Here’s why your hosting choice matters:
Performance and speed
Your marketplace’s loading speed directly affects user engagement and conversion rates. Studies show that a mere 1-second delay in page load time can result in a 7% reduction in conversions. A reliable hosting provider ensures your marketplace responds quickly, keeping both buyers and sellers engaged.
Scalability requirements
As your marketplace grows, your hosting solution needs to grow with it. The right provider offers flexible scaling options to handle increased traffic, transactions, and data without requiring complex migrations or causing downtime.
Security considerations
Marketplace platforms handle sensitive user data and financial transactions. Your hosting provider should offer robust security measures, including:
- SSL certificates
- Regular security updates
- DDoS protection
- Data backup systems
Setting up hosting for Sharetribe
The Sharetribe Web Template includes a Node.js/Express server – it’s not a static site. That server handles server-side rendering (SSR), single sign-on, and privileged transitions (the server-side pricing/payment logic that has to run somewhere trusted, not in the browser). This one architectural fact rules out an entire category of hosting:
Serverless platforms like Netlify and Vercel are not compatible with the Sharetribe Web Template. They’re built to run static sites and short-lived functions, not a persistent Node/Express server. Whatever hosting you choose, it needs to be able to run a long-lived Node.js process.
What Sharetribe itself recommends today
As of now, Sharetribe’s own developer documentation states its official recommendation is Heroku or Render, for the simple reason that both offer a “hassle-free installation” – you connect a GitHub repo, set environment variables, and deploy, without managing servers yourself. A few practical notes:
- Render currently offers a free tier, which is genuinely useful for a Test/staging environment. Sharetribe’s own tutorials point developers there first for that reason.
- Heroku no longer has a free tier – you’ll need a paid dyno from day one.
- Both integrate cleanly with GitHub for automatic deploys on push, which is a real time-saver for a small team.
Where AWS EC2 (and similar) still make sense
Sharetribe’s docs list AWS, Google Cloud, DigitalOcean, and Microsoft Azure as valid alternatives for teams that want full control over their infrastructure. This is where most of our more established clients end up, typically for one or more of these reasons:
- Cost at scale. Once traffic is significant and predictable, self-managed compute is usually cheaper per unit of traffic than managed-platform dynos.
- Multi-region deployment. EC2’s global data center footprint matters for marketplaces with meaningfully international user bases and latency-sensitive UX.
- Compliance/data residency requirements. Some clients need their data to live in a specific region or under specific controls that a fully managed platform doesn’t expose configuration for.
- Custom infrastructure needs – a Redis cache, a background job queue, a specific database setup – that go beyond what Render/Heroku’s add-on marketplace conveniently supports.
So the honest framing, updated from the original article: start with Render or Heroku unless you already know you need EC2’s control. Below is the EC2 walkthrough, updated for the current Node.js and Ubuntu requirements, for teams that do need it.
AWS EC2 vs. Heroku vs. Render at a glance

AWS EC2
✓ Complete control over infrastructure
✓ Flexible configuration options
✓ Extensive regional support for global reach
✓ Cost-effective at scale
✓ Advanced monitoring and security features
✗ You own patching, scaling, and process management yourself
Heroku
✓ Simpler deployment process
✓ Managed infrastructure
✗ No free tier
✗ Higher costs at scale
✗ Limited regional configurations
✗ Less control over infrastructure
Render
✓ Simple, Heroku-like deployment experience
✓ Free tier available (good for Test environments)
✓ Automatic TLS certificate management
✗ Fewer regions than AWS
✗ Less granular infrastructure control than EC2
For most Sharetribe marketplaces, we recommend AWS EC2 due to its balance of control, cost-effectiveness, and scalability.
Comprehensive AWS EC2 deployment guide
Prerequisites
Before starting, ensure you have:
- An AWS account
- A registered domain
- Basic familiarity with SSH and Linux commands
- SSH key pair generated for secure access
Launching your EC2 instance
a) Select an AMI:
- Navigate to EC2 Dashboard
- Navigate to the EC2 Dashboard
- Choose Ubuntu Server 24.04 LTS (HVM) – this is the current Ubuntu LTS release (supported through 2029) and the sensible default today; the 22.04 LTS release this guide previously recommended is still supported but is no longer the newest option
- This provides a stable, well-supported environment for Sharetribe
b) Choose instance type:
- For small marketplaces: t3.medium (2 vCPU, 4GB RAM)
- For growing marketplaces: t3.large (2 vCPU, 8GB RAM)
- For established marketplaces: Consider t3.xlarge or larger
- Without backend (frontend-only marketplace): t3.small (2 vCPU, 2GB RAM)
c) Configure security groups
Security groups act as a firewall, managing access to your instance. Set up rules to allow:
- HTTP (port 80) for basic web traffic
- HTTPS (port 443) for secure, encrypted access
- SSH (port 22), ideally restricted to your own IP address rather than left open to the world
Connecting via SSH
To manage your EC2 instance securely, you’ll need to connect via SSH. Follow these steps:
- Open a terminal client on your local machine.
- Set the correct permissions for your SSH key to ensure security by running: ssh -i “YourKeyPair.pem” ubuntu@your-ec2-public-dns
- Run the SSH command to connect to your EC2 instance:
- Replace YourKeyPair.pem with the full file path to your private key.
- Replace your-ec2-public-dns with your instance’s public DNS, which can be found in the EC2 Management Console.
This process involves using your terminal to log into your instance with the credentials provided by AWS.
Installing necessary Software
Once connected to your instance, update the system and install the current required Node.js version. This is the main thing that’s changed since 2024: the Sharetribe Web Template’s package.json now requires Node ^22.22.0 or Node >=24.0.0 – Node 20, which the previous version of this guide installed, is no longer supported by the template.
# Update the system
sudo apt update && sudo apt upgrade -y
# Install Node.js 22 LTS (or use setup_24.x for Node 24 LTS)
curl -fsSL https://deb.nodesource.com/setup_22.x | sudo -E bash –
sudo apt-get install -y nodejs
# Confirm the version before proceeding
node -v # should print v22.22.x or higher
# Install Git
sudo apt-get install -y git
# Clone your Sharetribe repository
git clone https://github.com/yourusername/your-repo.git
cd your-repo
# Install Yarn and project dependencies
npm install -g yarn
yarn install
If you’re maintaining an older fork of the template that still pins an older Node version in its own package.json, you’ll want to update that engines field as part of this migration — otherwise yarn install may fail outright, or worse, silently install with a Node version your dependencies weren’t tested against.
Domain configuration
To make your marketplace accessible to users via a custom domain, follow these steps to configure your DNS domain with SSL protection:
- Update DNS records: Point your domain’s A record to the public IP address of your EC2 instance. This may take some time to propagate.
- Install Nginx: This web server software will help manage incoming traffic to your marketplace.# Install Nginx
sudo apt-get install -y nginx
# Install Certbot for Nginx
sudo apt-get install -y certbot python3-certbot-nginx
- Obtain an SSL certificate: Use a tool like Certbot to secure your marketplace with an SSL certificate, ensuring that all communication is encrypted and safe.
# Obtain and install SSL certificate
sudo certbot –nginx -d yourdomain.com -d www.yourdomain.com
Running the template in production
To test the app, you can run it directly:
NODE_ENV=production PORT=3000 yarn start
Make sure you’ve run yarn build first to generate the production build files. For anything beyond a quick test, running the app over an SSH session isn’t a durable setup – the process dies when the SSH session ends or the server restarts. Use a process manager instead:
npm install -g pm2
pm2 start yarn –name “my-marketplace” — start –env NODE_ENV=production –env PORT=3000
Docker is also a solid option if you’d rather run the template in a container – Sharetribe’s own docs now include an official guide for running the Web Template in Docker, which is worth checking if your team is already standardized on containers.
Scaling and maintenance
AWS EC2 offers scaling solutions to help your marketplace handle varying traffic:
- Set up auto-scaling: Configure EC2’s auto-scaling features to dynamically add or remove instances based on demand, ensuring a consistent user experience.
- Enable load balancing: A load balancer distributes traffic evenly across instances, enhancing performance and reliability.
- Monitor with AWS CloudWatch: AWS CloudWatch allows you to monitor the health and performance of your instances, making it easy to detect issues and optimize resources.
When considering hosting options for your marketplace, it’s important to explore providers that balance reliability, scalability, and cost-effectiveness. While many marketplace owners opt for platforms like AWS, another excellent option is DigitalOcean. Known for its straightforward setup and user-friendly interface, DigitalOcean offers robust performance at a competitive price, so it is a practical choice for startups and growing marketplaces alike.
DigitalOcean’s scalable infrastructure and variety of plans allow for easy adjustments as your marketplace expands, and it supports popular tools like Docker, Kubernetes, and managed databases.
Deploying to Render, if you’d rather start there
Since Render is now Sharetribe’s first recommendation for most teams, the short version of that path:
- Push your forked Web Template repository to GitHub.
- Create a new Web Service in the Render dashboard and connect your repository.
- Set the required environment variables (client ID and secret from Sharetribe Console, Stripe publishable key, and the rest of the mandatory variables listed in Sharetribe’s environment variable reference).
- Deploy. Render manages TLS certificates automatically, and you can attach a custom domain from the service settings.
This is meaningfully less setup than the EC2 path above — the trade-off is less control over the underlying server and, at meaningful scale, typically a higher cost per unit of traffic than self-managed compute.
Pricing plans and hosting features of Sharetribe
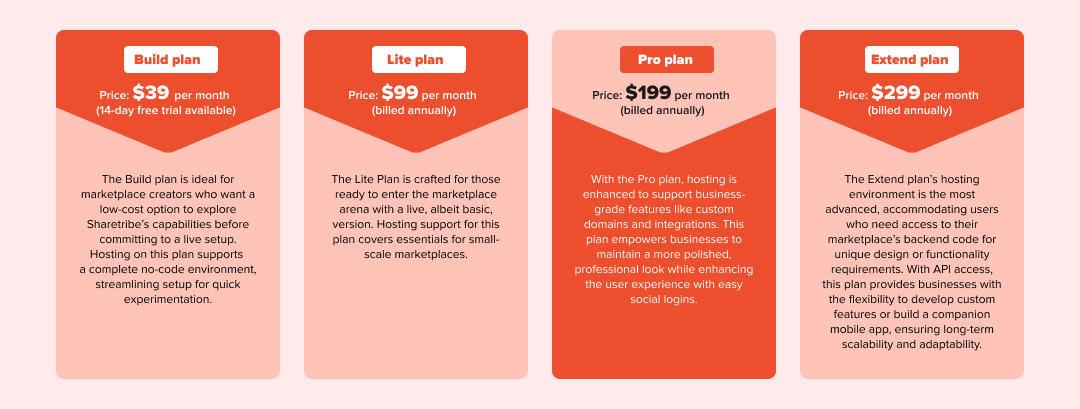
Build plan
Price: $39 per month (14-day free trial available)
The Build plan is ideal for marketplace creators who want a low-cost option to explore Sharetribe’s capabilities before committing to a live setup. Hosting on this plan supports a complete no-code environment, streamlining setup for quick experimentation.
Lite plan
Price: $99 per month (billed annually)
The Lite Plan is crafted for those ready to enter the marketplace arena with a live, albeit basic, version. Hosting support for this plan covers essentials for small-scale marketplaces.
Pro plan
Price: $199 per month (billed annually)
With the Pro plan, hosting is enhanced to support business-grade features like custom domains and integrations. This plan empowers businesses to maintain a more polished, professional look while enhancing the user experience with easy social logins.
Extend plan
Price: $299 per month (billed annually)
The Extend plan’s hosting environment is the most advanced, accommodating users who need access to their marketplace’s backend code for unique design or functionality requirements. With API access, this plan provides businesses with the flexibility to develop custom features or build a companion mobile app, ensuring long-term scalability and adaptability.
Hosting features across plans
Each Sharetribe hosting cost plan includes essential hosting features designed to streamline marketplace creation and management, with options for no-code users as well as those who need access to custom code. Here’s a breakdown of hosting features common across the plans:
- No-code mode: All Sharetribe hosting pricing plans support a no-code setup, empowering users without technical expertise to launch and manage their marketplaces effortlessly.
- Custom code mode: Available in the Extend plan, this mode gives developers the flexibility to implement custom features and integrations, enabling advanced modifications as the business scales.
- Transaction management: Each plan includes a monthly transaction quota, allowing marketplace owners to manage a base level of transactions without additional fees. Additional transactions are offered at a standard rate, making it simple to predict hosting costs as traffic grows.
Conclusion

Finding the right hosting setup is one of the most important steps toward a Sharetribe marketplace that lasts. The hosting environment affects everything: performance, scalability, customization potential, and user experience.
If you’re just getting your custom-code marketplace off the ground, Sharetribe’s own recommendation – Render or Heroku – is a legitimate, low-friction starting point, and Render’s free tier makes it an easy way to stand up a Test environment at zero cost. As your marketplace grows and your infrastructure needs become more specific – cost efficiency at scale, multi-region latency, compliance requirements – AWS EC2 and similar self-managed options become worth the extra setup effort.
Whichever path you choose, make sure your team is running a current, supported Node.js version (22 LTS or 24 LTS, as of this writing); using an outdated version is one of the most common, and most avoidable, causes of failed deployments we see when taking over a Sharetribe project from another team.

Recommended articles
 How to create a discount code on a Sharetribe marketplace
Discount codes are more than just price reductions – they're a strategic tool that can revolutionize your Sharetribe marketplace. From transforming window shoppers into loyal customers to providing invaluable market insights, these digital keys unlock a world of e-commerce potential.
 How to Migrate your Marketplace from Sharetribe Go to Sharetribe
A comprehensive roadmap for marketplace owners navigating the technical transition from Sharetribe Go to the New Sharetribe, ensuring seamless platform migration with minimal operational disruption.
 What’s Different About the New Sharetribe and Why You Should Try It
A breakthrough solution that eliminates traditional barriers to online marketplace creation. Sharetribe offers unprecedented customization, integrated tools, and a user-friendly interface that empowers entrepreneurs to turn innovative ideas into fully functional digital platforms quickly and cost-effectively.
 The World’s Best Sharetribe Marketplaces
Online marketplaces are hot. It would seem difficult to compete with such market giants as Airbnb, Etsy, and Fiverr, however, there is always someone who is willing to take the risk. After all, as they say, nothing ventured